Our Book Conservator, Brannah, recently completed conservation treatment on MS 1059, St Machar’s Cathedral, Aberdeen: restoration papers including sketches and notes by G.R. Taylor, painter and decorator.
The manuscript
There was a large scheme of improvement and repairs in 1867/1868 with the Cathedral closed for fifteenth months, only re-opening in September 1868. A major part of this repair project was the installation of a new roof and the heraldic shields returned to a reconditioned ceiling. G.R. Taylor, painter and decorator, Aberdeen, was involved in the restoration project, including the re-painting of the shields on the heraldic ceiling. The manuscript consists largely of his drawings of various decorative and architectural features of St Machar’s cathedral. The volume was presented to the University of Aberdeen by J.B Bisset in 1938.
The volume was chosen for conservation both because of its poor condition and because St Machar’s Cathedral lies only half a mile from the University, giving the book local interest.
The major conservation issue was that the textblock had broken into a number of pieces and any consultation by readers was likely to result in further damage to the volume. There were losses of leather on the spine and the remaining leather was weak and brittle. One endband was missing and only half of the other remained.


Treatment
In order to have a full record of the volume’s condition prior to treatment the volume was photographed and a description of its condition was written. This is done for every item which receives conservation treatment.
The volume was then cleaned with soft brushes and a vulcanised rubber sponge.

The leather was consolidated using hydroxypropylcellulose in isopropanol. This improves the strength of the leather so that it can be lifted during the repair process and also helps to prevent the leather from darkening when adhesive is applied to it.

The leather was lifted off the spine and along the edges of the boards with a fine metal spatula.

After the spine leather had been removed a wheat starch poultice was used to soften the remaining leather fibres and the animal glue which had been used to glue the spine. The poultice, and the glue, were then removed with a spatula. Removing the hard brittle glue improved the flexibility of the spine and made it possible to carry out repairs.

Once the spine had been cleaned the spine folds of the sections of the book were reinforced with strips of Japanese tissue paper prior to resewing.
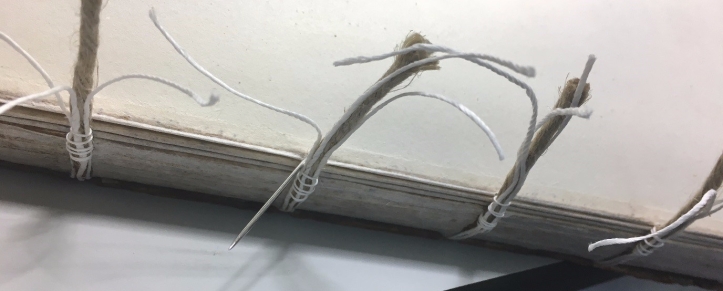
The loose and detached sections of the textblock were resewn. Small sections of sewing cord were added to replace missing areas where the original cords were broken. Supporting threads were also added to provide addition support which bridged the entire width of the spine.
Once the sewing was complete the spine was lined with a layer of Japanese tissue paper to help the spine hold a rounded shape.
Next the endbands were sewn. In the case of the partial endband the existing portion was left in place and the other half was resewn.

A transverse lining of aero linen was adhered to the spine with wheat starch paste. This lining strengthened the attachment between the boards and the textblock while also restricting the movement of the spine so as not to overstrain the sewing when the book is opened.

Because the textblock is made of stiff paper and the original spine leather was quite brittle it was decided to change the original structure by adding a hollow. This would allow the spine of the textblock to flex allowing the content to be clearly seen but the leather of the spine would be supported by the hollow and would have to flex much less than if it were pasted straight onto the spine, as was originally the case.
A spine former was made by moulding Japanese tissue paper over the spine, a little like papier-mâché. This meant that the spine former would be exactly the same shape as the spine and would accommodate the raised sewing supports. Cling film was placed over the book to prevent the spine former sticking to the textblock.

Once everything was dry the cling film was removed and the spine former was attached to a piece of aero linen which would form the hollow.

The flanges of the aero linen were adhered to the boards to form the hollow. Toned Japanese tissue was then applied to the hollow to infill the areas of missing leather.

The original leather was adhered to the hollow and the book was wrapped in bandages overnight to apply pressure until the adhesive had dried.

The volume is now in one piece and opens well, allowing the contents to be easily viewed.


